The console tour
The console is where you manage a site. Here's what each part of the chrome does.
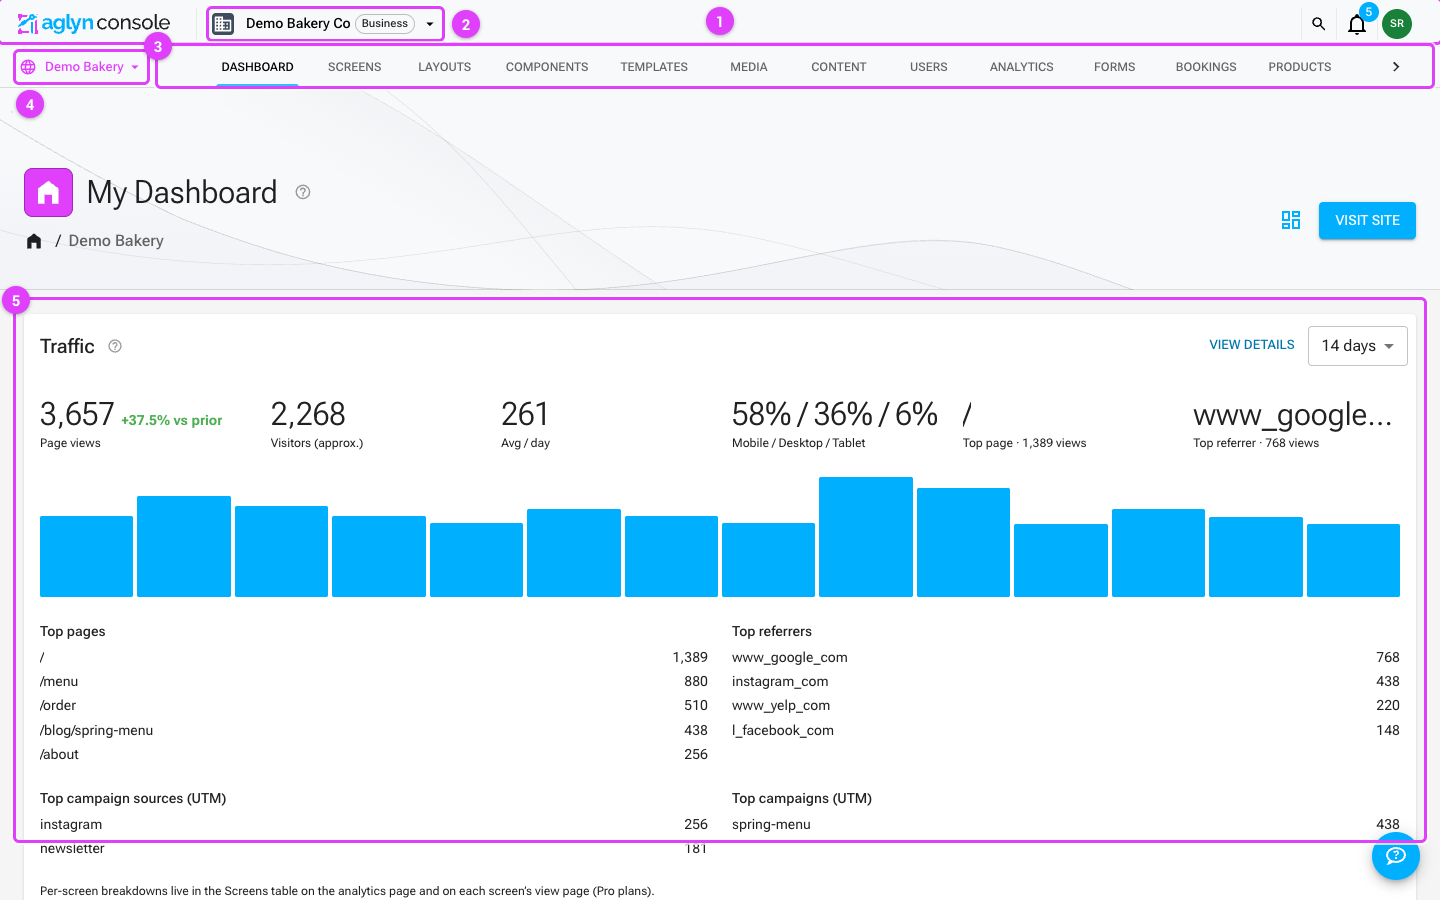
- App bar — the Aglyn console wordmark, search, notifications, and your account menu.
- Workspace switcher — jump between the organizations you belong to.
- Site sections — every area of the selected site (Dashboard, Pages, Media, Content, …).
- Site switcher — switch between the sites in your workspace.
- Page body — the selected section's cards and tables.
The app bar
- Site switcher (left) — jump between the sites you belong to, search them by name with Find site…, or create a new one.
- Breadcrumbs — show the current site's display name and where you are.
- Page switcher — a searchable dropdown for hopping between pages without leaving the editor: your recent pages by default, or type to find any page or layout in the site by name. View all pages opens the full list.
- Version dropdown (right, near your avatar) — pick or schedule a version to view.
- Notifications — the bell shows an unread badge and drops down your 10 most recent notifications (form submissions, bookings, invoices, team changes), split across an Inbox tab (unread) and an Archive tab (already read). Mark all read clears the inbox, the gear opens your notification preferences, and View all opens the full paginated feed. The badge turns red while an unread critical notification is waiting, and amber for an unread warning. Each notification is colored the way the feed colors it (below).
- Account menu — your avatar opens it. The header shows your name and email with a gear to Manage Account, and the first row below repeats that destination as a labeled Manage account — a gear is not discoverable as a name. Then come Manage Team, Billing and Support, which appear only on a page that names a workspace and only for members whose role can reach those pages; Staff console (Aglyn staff only); a Documentation link that opens this docs site in a new tab; and Report an issue, directly under Documentation because "the docs didn't answer it" is the step before reporting it. Report an issue opens a form over the page you're on rather than navigating away — the page you were looking at is the most useful thing the report carries — and unlike the rows above it, it needs no particular role, no resolved workspace, and no paid plan: every signed-in member has it on every page. See Report an issue. Below that the menu holds the theme toggle (light / system / dark), an Upgrade plan button — shown only when your workspace has a higher plan to move to, and only to members who can open Billing — Sign out, and a footer naming your current workspace and plan.
In-context help
Look for the small ? icons throughout the console — next to page titles, card titles, form fields, table column headers, and the Besigner's style and attribute panels. Hover one for a one- or two-line explanation, and click it (or the Open documentation link in the tooltip) to jump straight to the matching section of these docs in a new tab.
Filter and search a list
Most lists in the console are tables with the same toolbar above them: Columns shows and hides columns, Filters narrows the rows, Export downloads the table, and Search finds rows by their words. They work the same way on every list. A list drawn as cards rather than a table — such as All Sites — keeps its cards and has the same Search box, Filters panel and chips above them.
- Filters opens a panel that edits one filter at a time: pick a column, an operator and a value. Pick another column and set it too, and both apply — filters on different columns add up, and each column holds one filter. Clearing the value, or deleting the panel's row, drops that column's filter.
- Chips above the table show every filter in force, each read as a sentence such as "Status is Suspended". The panel shows one filter at a time; the chips show them all. Remove a chip to drop its filter.
- Search finds records by the start of a word in the things that list searches — each list's page names them. It matches one word at a time: type "acm" and "Acme Coffee" is found; type two words and the list searches the first and says so. A word is read up to its first 12 letters. Search adds to the filters, and an empty box shows the list unfiltered again.
- The pager at the foot of the table then turns through the matches, not the whole list.
Every filter and every search word is answered by the list's query, across the whole list — never only the rows already on screen. A record that matches is found whether it would have been on the first page or the fortieth. Two limits follow from asking one query:
- A filter a query can't answer isn't offered. The panel lists only the columns and operators the list can look up.
- A combination one query can't hold is refused by name. A note above the list names the filter or search it set aside — for example, two date ranges at once, a search together with a filter that also matches words, or more than thirty picked values at once — and the list shows what the rest of them match. Remove one to apply the other. Nothing is ever quietly left out of the results.
A list keeps its query's order, and a range filter orders the list by the field it ranges over — for a date, usually newest first. So most column headers don't re-sort a list; where one does (the Media library's List view, a collection's entries), it asks the query for that order across the whole list.
Someone who can see only some sites searches the lists shared across sites by the start of a name (or of an address, where the list has no name), beside the sites they can see; the list says so when it does.
A few lists read from somewhere other than the console's database and search there instead: billing invoices ask Stripe, and the staff Users list asks the sign-in service.
Primary navigation
The tabs across the top of a site are its sections. Some are always present; the rest are contributed by the plugins your workspace has enabled — so two sites, or the same site before and after you enable a plugin, can show different tabs. Don't be surprised by a tab strip that doesn't match a screenshot exactly.
These four are where a new site's work happens:
| Section | What's there |
|---|---|
| Dashboard | The site at a glance — analytics and recent-signup summaries, and the ten most recent activity entries. |
| Pages | The page hierarchy — create, reorder (drag-and-drop), and open pages. This is where you build; start at Publish your first page. |
| Media | The media library — folders, images, video, and files. |
| Setup | Basic details, SEO, tracking, theme, and emails. Each tab is deep-linkable — the ?tab= in the URL follows you, so you can bookmark or share the exact one. |
Alongside them, and always present: Layouts and Components (the shared frames and reusable pieces pages are assembled from — see Pages & Layouts), Templates (saved starting points), Content (collections and blog entries), Users (the people who sign in to the site you're building, not your own team), and Analytics. Admin appears only if you're an owner or admin of the site; it holds per-site plugin settings, the custom domain, the site's security lists, the full activity log, and the danger zone.
Tabs such as Data, Products, Logic, Automation, Inbox, Bookings, Events, Redirects, Marketing and Marketplace are contributed by plugins and appear only where that plugin is enabled for your workspace (they're inserted after Analytics). If a section these docs describe isn't in your tab strip, that's usually why — enable the plugin under Organization → Plugins.
Billing is not a site section. Plan cards and usage meters are workspace-wide and live in your account menu under Billing — one bill covers every site in the workspace.
Editing vs. managing
You can manage a page (rename, schedule, view raw JSON) from its detail view without opening the editor. When you want to design it, open the Besigner.
The Sites list
All Sites is the front door of a workspace: one card per site, for the workspace currently selected in the switcher, in name order. A site you can reach in another organization isn't missing — it's behind the workspace switcher.
Each card carries:
- The site's display name as the title, with its hostname underneath as the
subheader — the custom domain when the site has one, otherwise its
name.aglyn.appaddress. Both are also listed inside the card, as Aglyn Domain and Custom Domain. - A status pill (below).
- Visit, which opens the live site in a new tab, and Manage, which opens that site's dashboard in the console.
Above the cards are a Search box and a Filters button — the same controls a
table's toolbar has, over the cards. Search finds a site by the start of any word of
its name, its slug (the name in name.aglyn.app) or its custom domain: harbor,
bakery and shop.harbor all find Harbor Bakery at shop.harbor-bakery.com.
Filters narrows the cards by Custom domain (Connected or None) and by the day a
site was Created — is, after, on or after, before or on or before
a day. Each filter in force shows as a chip above the cards; remove a chip to drop it. A
filter on the created date lists the cards newest first instead of by name.
The search and the filters are answered by the query that reads the cards, across every site you have in the workspace, not only the cards on screen. The cards come twelve at a time; Load more adds the next twelve that match. The site count opposite the heading always counts every site. Status, plan, owner and the last-updated date are not filters: a site's status can change with no save at all (a timed suspension ends on its own), and a site doesn't store its plan, owner or template. See Filter and search a list.
The status pill
| Pill | Hover tells you |
|---|---|
| Live (green) | How many pages are published — "12 published pages." |
| Draft (gray outline) | "Nothing published yet — visitors see the placeholder." |
| Maintenance (amber) | "Every path serves the maintenance page." |
| Suspended (red) | "This site is serving a lockdown notice instead of content." |
Live means exactly one thing: the site has at least one published page. Publishing writes the routing map the site is served from, and the pill is read off that map — so it costs no extra lookup on a list of a hundred sites, and it is not a health check. A site with a misconfigured domain still reads Live if it has published pages.
How the pill is decided
Reference detail, and the reason the pill is worth reading rather than glancing at: a site can be in several of these states at once, and the pill reports the first that applies, in this order.
- Suspended — the site record carries a suspension that hasn't ended.
- Maintenance — maintenance mode is on.
- Live — at least one published page.
- Draft — everything else.
So a suspended or maintenance site is never shown as Live, however much it has published. The order is the point: reporting either as Live would be the console agreeing with someone who thinks their site is up while every request is being served a lockdown or maintenance page.
A timed suspension whose end has already passed is treated as over, even though the suspension fields are still on the record, and the site falls through to whatever it would otherwise be. The published site applies the same rule, so the two agree.
Your site allowance
Opposite the All Sites heading, beside Create site, a line reads
6 of 10 sites · Business plan — how many sites this workspace has, against how many
its plan includes, and which plan that is. Create site sits next to it, and appears
only if your role can create sites.
The line stays blank until both the workspace and its plan have resolved, rather than filling in a partial answer. An unresolved organization reads as Free, and a Business customer told for a moment that they're at "1 of 1 site" has been handed a false upgrade prompt by a page that was only loading. No line at all is the better answer while it waits.
Raising the limit is a billing change — see Billing & plans.
A site's dashboard
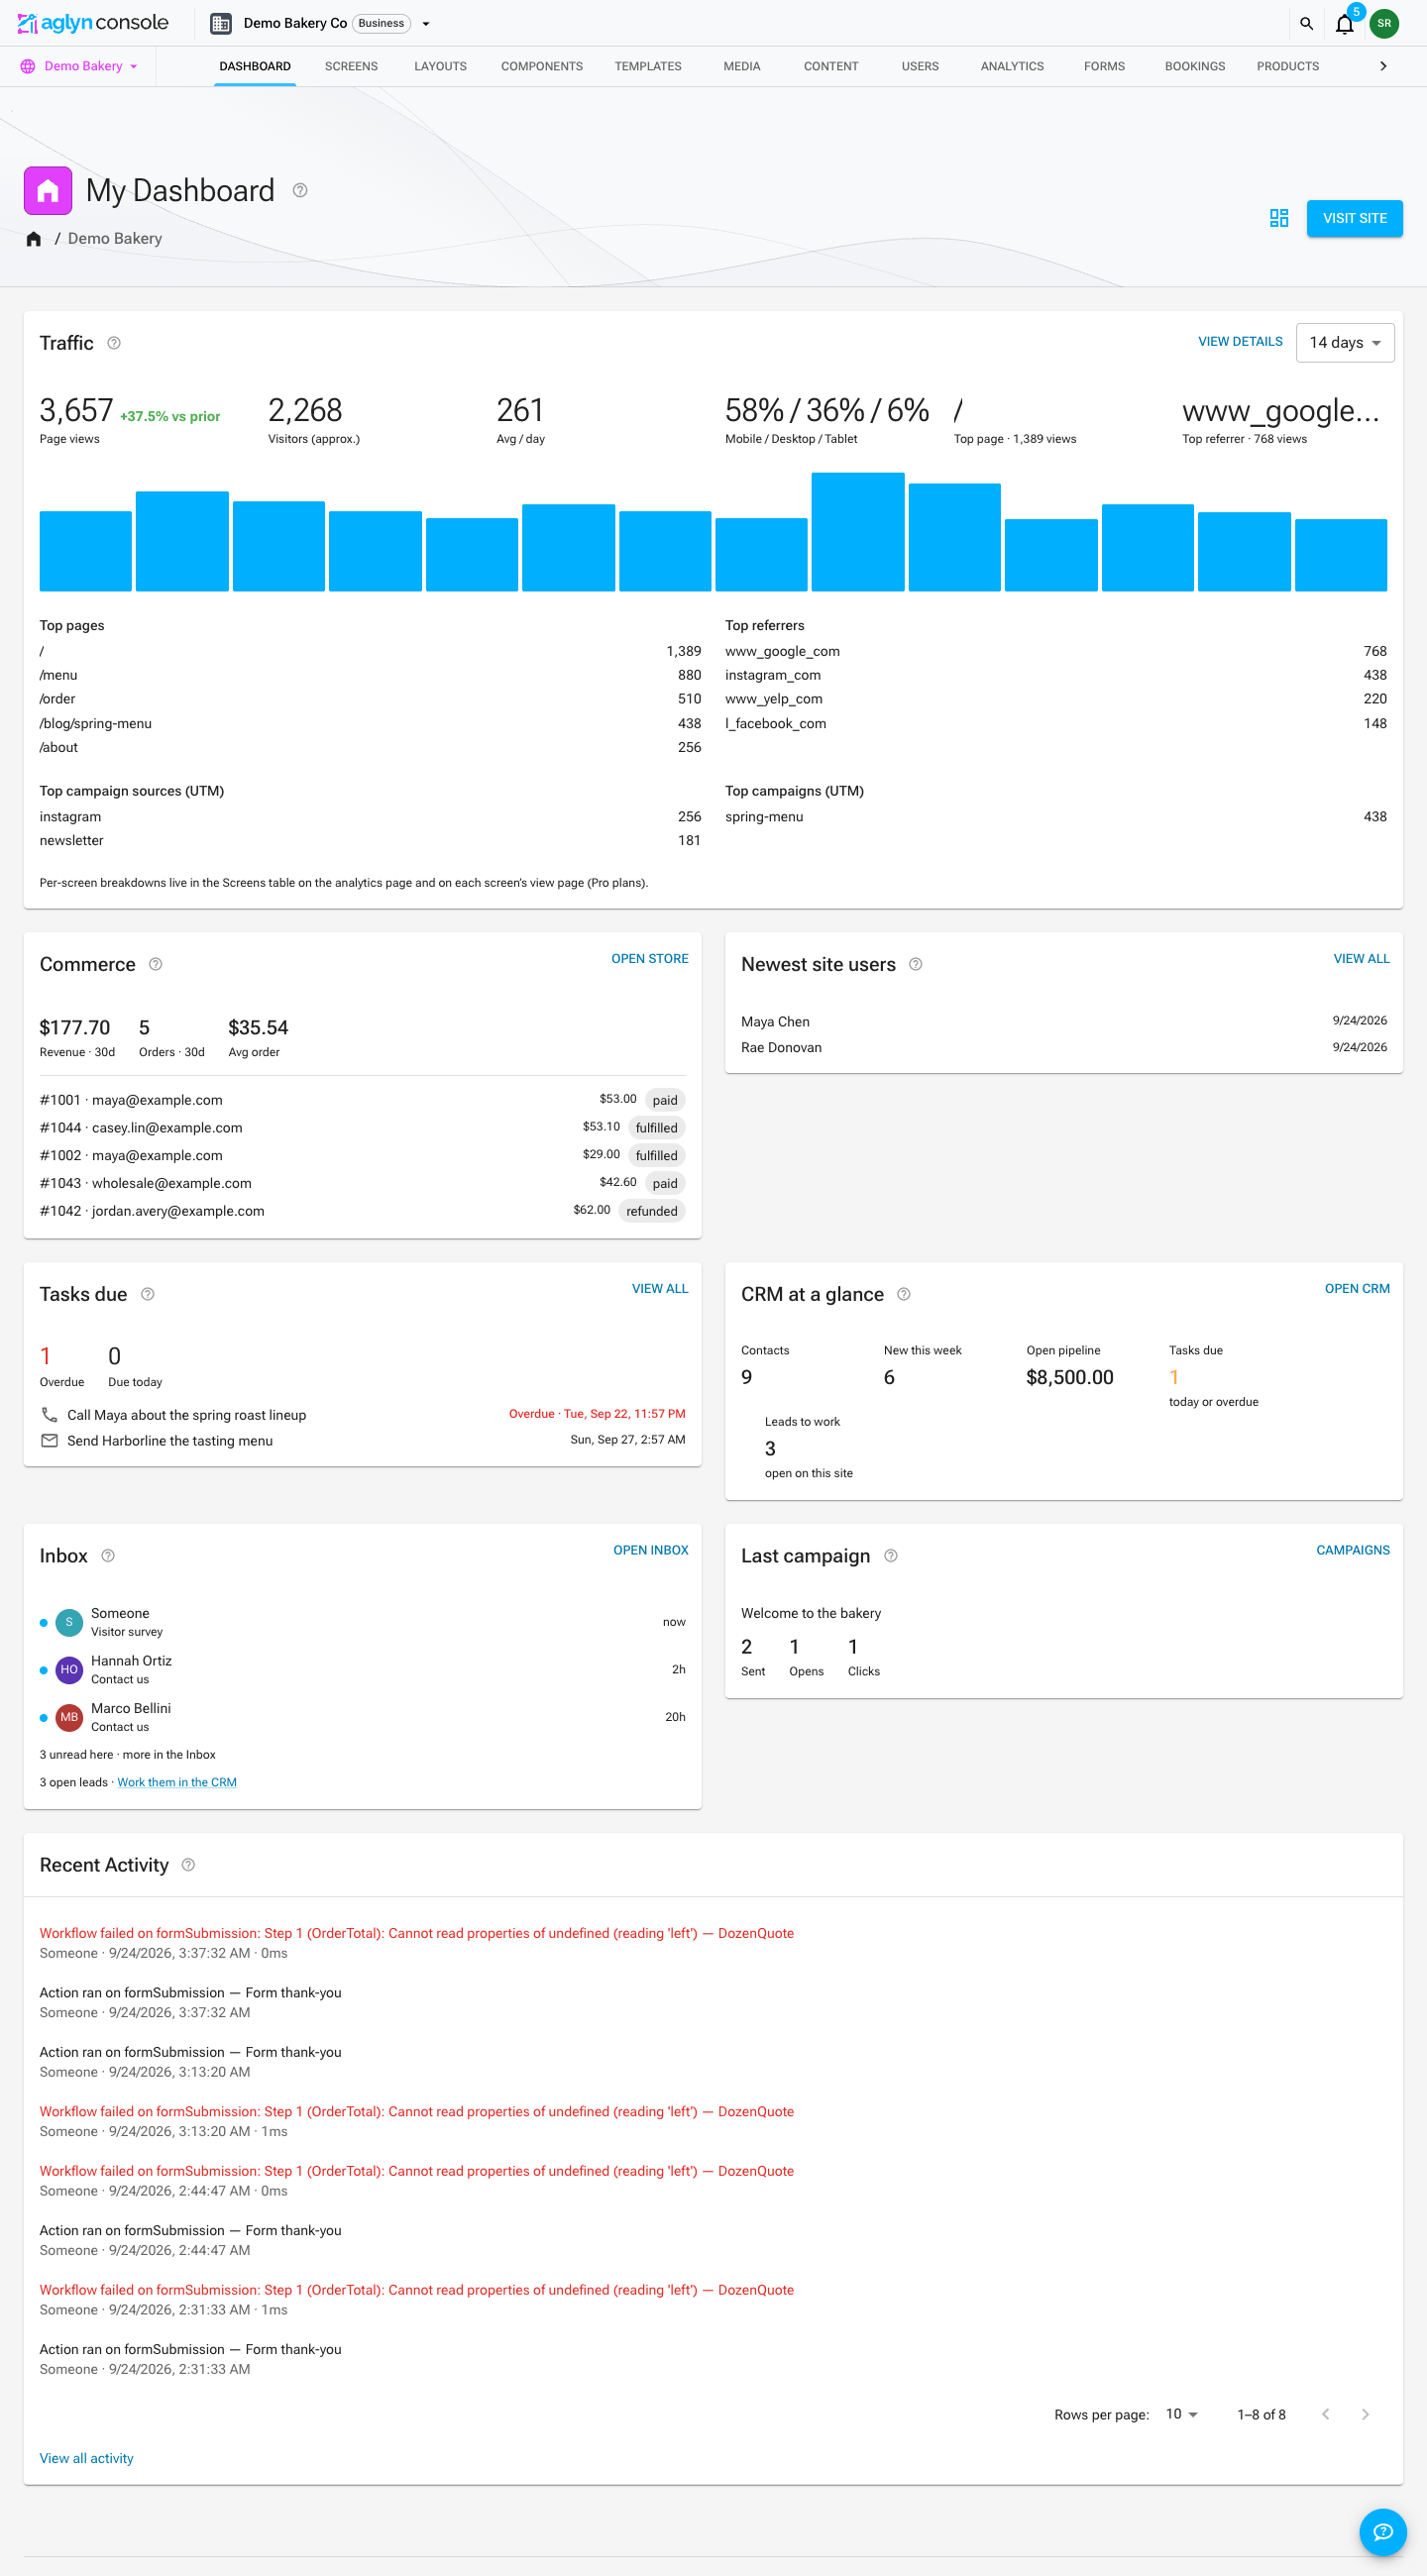
Opening a site lands you on its dashboard. It's a place to glance at the site, not to edit it — every card is a summary with a link to the section that owns the detail:
- Traffic — pageviews over a window you choose (14 days by default). View details opens Analytics.
- Newest site users — the five most recent people who signed up on your site. View all opens Users.
- Recent Activity — the ten most recent changes, each naming the thing that changed ("Saved the screen — Home") and linking straight to it. A change an integration made through the REST API is attributed to its key by name — API key Zapier — rather than to a person. The full, paginated log lives under Admin → Activity.
Plugins contribute the rest, so this list is a floor rather than an exact match for your own dashboard: Last campaign appears once you've sent an email campaign, Commerce where the commerce plugin is enabled and the site has products or orders, Tasks due and CRM at a glance where the CRM is on, and Inbox with the site's unread form submissions. A brand-new site shows the same cards with empty states — "No pageviews recorded yet", "No activity yet" — which is what a first visit should look like.
Two things people expect here and won't find: role management lives under Users, and the announcement bar and promotional popup live under Marketing.
Visit site, in the dashboard header, opens the published site in a new tab with the admin bar armed — the route from a site's own dashboard to the site itself, without going back out to the Sites list and in through a card action.
Next
Workspace settings & notifications
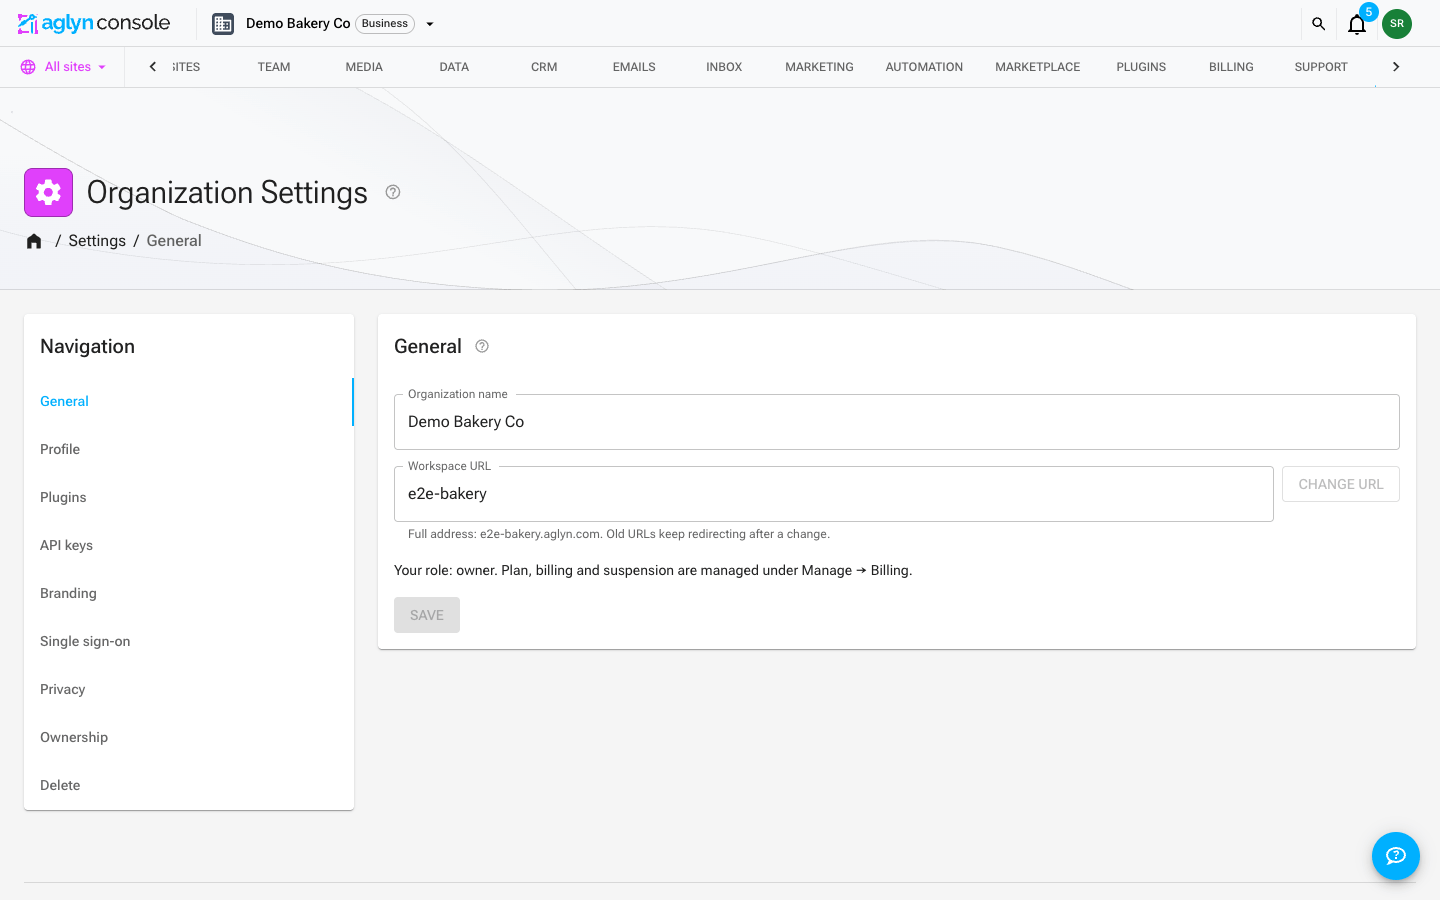
Organization-wide settings (name, workspace URL) live under Organization → Settings, which also holds Profile, API keys, Branding, Single sign-on, Privacy, Ownership and Delete. Turning plugins on and off for the workspace is its own section, Organization → Plugins — Marketplace is for finding and installing new ones, not for administering what you already run:
The notifications feed
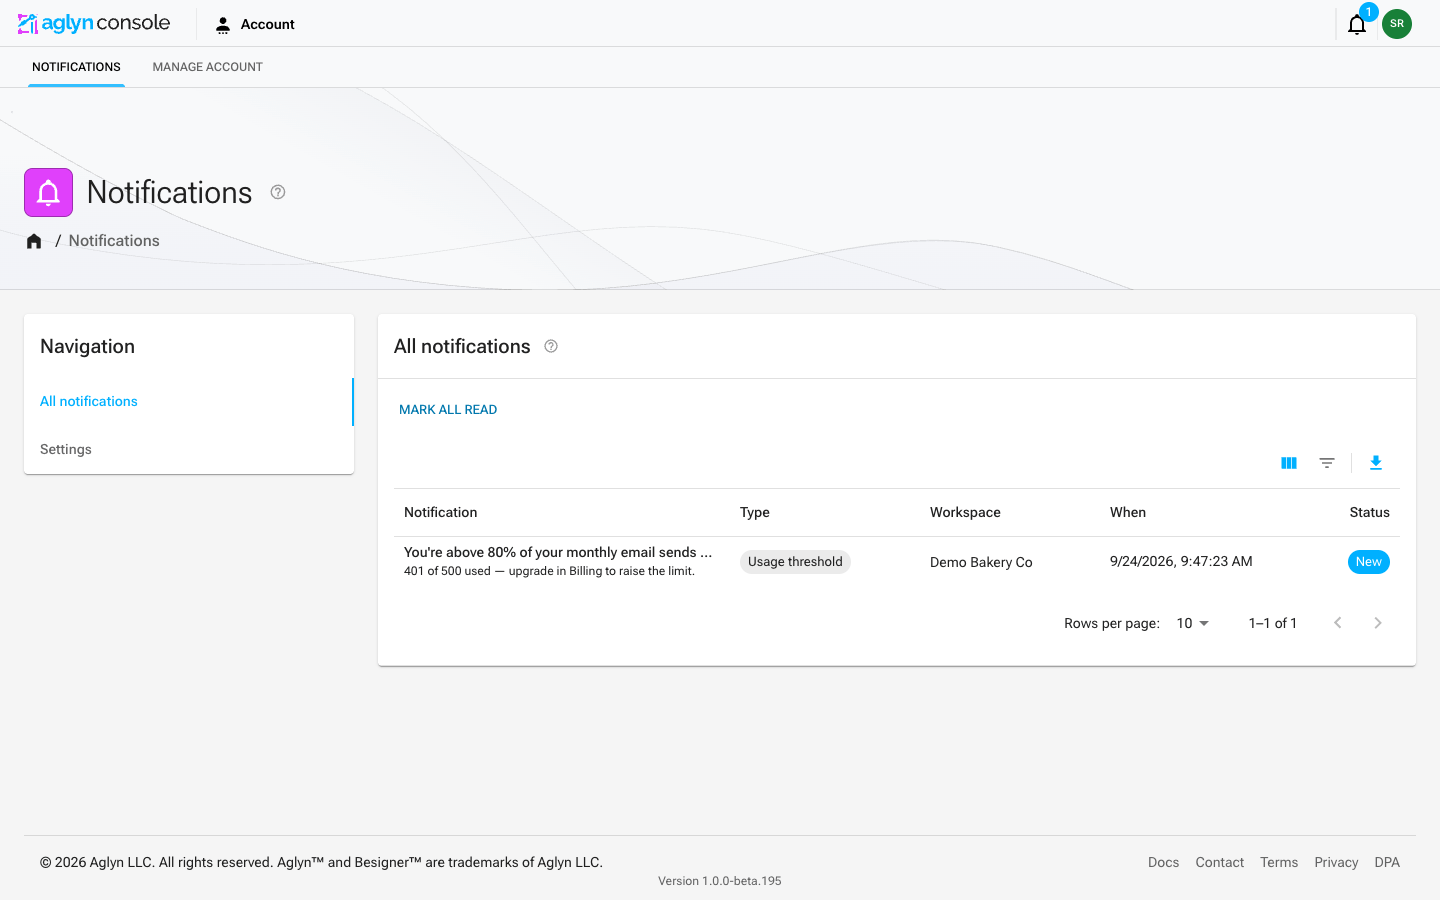
Your in-app notification feed — billing, publishing, workflow failures — lives under Notifications, which has two sections in the rail on the left: All notifications and Settings. The first shows what arrived, newest first, with Mark all read above it. The feed's Filters narrows it by Type (is one type, or is any of up to thirty — a larger pick is refused, with a note above the feed) and by Status (is New or Read), and both can stand together. Each filter in force shows as a chip above the feed; remove the chip to drop it. The filters apply to the whole feed, not just the page on screen, and the pager then turns through the matches; see Filter and search a list. There is no search box, because a notification's words are not indexed:
How urgent each notification is
Every notification carries a level, shown by the icon at the start of its row and the color of its type, both in the feed and in the bell:
| Level | Looks like | For example |
|---|---|---|
| Critical | Red icon, solid red type, red bar and a red wash over the row | A fraud signal, a failed payment, a form that stopped accepting submissions |
| Warning | Amber icon, amber type, amber bar and a light amber wash | A limit reached, low stock, a held email |
| Good news | Green icon, green type, green bar | An order or a booking, a new subscription |
| Info | Blue icon, blue type | An invitation, a support reply, a usage step on the way to a limit |
| Routine | Gray bell | A form submission, an assignment, a digest |
The level belongs to the notification, not only to its type. A usage notice at 75% of a limit is Info and the one at 100% is a Warning; a released hold is Info while the hold itself was red. The color is for scanning only. Every notification still reads as words, and the icon names its level for screen readers.
Notification settings
Everything about what reaches you lives on the second section, Settings.
What you are told about is a table: one row per category, one column for In console and one for Email. Each row says what arrives in that category, so you are never switching off a bucket you would have to guess the contents of.
- In console is on for every category. Switching it off stops that category appearing in the feed and in the bell.
- Email is on for your site's transactions — Form submission, New booking and New order — and off for everything else. Switch a category or a single notification on and you also get a message in your inbox when one arrives; switch it off and you don't. This does not touch the mail Aglyn already sends you — invites, verification, receipts, password resets and dunning are separate, and are not affected by anything on this page.
Rows marked Staff only are Aglyn's own — they are shown to staff and reach nobody else. They are about the platform rather than any one workspace, which is why they appear here and not under One workspace or one site.
One kind at a time
Open a category with the arrow beside its name and it lists the individual notifications inside it, each with its own In console and Email switches. A switch here shows what would actually happen: its own answer if you have given one, otherwise its category's if you have set that, otherwise its default — which is why Form submission reads on under a Content row whose email is off.
Set one and the row is marked Set, with Follow category beside it to put it back. This is how you stop hearing about one thing without silencing its neighbors — turning Payment failed off leaves the rest of Billing alone.
A digest's Email switch is grayed out here, because a digest composes and sends its own mail under its own switch in Digests below.
These are answers for your whole account. A narrower scope still wins: a workspace or site answer overrides what you said about the kind of notification here.
Workspace and site overrides
One workspace or one site sets the same answers for a single workspace or a single site, rather than for your whole account. Each cell starts at Inherit, which means it follows the level above it: a site follows its workspace, a workspace follows your account. Set one to On or Off and only that scope changes. This is how you take form submissions by email from one busy site without taking them from the other five.
Categories open here too, so a scope can answer for a single notification rather than a whole category — the finest grain, in the place the noise usually is. A type set to Inherit follows its own category at that scope; a category set to Inherit follows the scope above it.
Staff rows do not appear here. They are about the platform, not about any one workspace, so there is nothing for a workspace answer to change.
Daily digests
Daily CRM digest is on by default. Each morning it sends you one notification and one email listing your overdue and due-today tasks and the leads nobody has worked, across every workspace you belong to. Switch it off to stop both. Switching the Forms & bookings console channel off silences the digest's console notification but not its email. What it counts, and when, is in Tasks & follow-ups.
Weekly insights appear beside it once you have turned them on for a workspace from Ask about your numbers, with one switch per workspace. They are off unless you turn them on. See Insights.
Task reminders — the notification and email a CRM task sends at its own due time — are Forms & bookings notifications, beside Task assigned to you. Open that category to switch Task reminder on or off by itself, or switch the whole category off to stop both the notification and the email for everything in it; a single task is silenced by clearing its Remind me field. See Reminders.
Alerts on this device
At the foot of the Settings section, three switches control how a new notification reaches you in this browser:
- Unread count in tab title — badges the browser tab, e.g.
(3) Aglyn, so you can see new activity from another tab. On by default. - Sound — a short chime when a notification arrives. On by default on a browser you haven't set it on before; a device where you already turned it off keeps your choice.
- Desktop notifications — a system notification, shown only while the Aglyn tab is in the background (in the foreground, the bell and chime already tell you). Off by default; switching it on asks your browser for permission. If you previously blocked notifications for the site, re-allow them in your browser settings first.
These are per-device, not per-account: notification permission is granted per browser, so muting sound on your laptop leaves your other devices alone. Everything above them is account-wide and applies everywhere you sign in.
Send test alert plays the chime and, if you've allowed them, fires a desktop notification — so you can confirm your setup works instead of discovering weeks later that you never heard a thing. The chime always plays, even with Sound switched off, so you can hear it before deciding.
Aglyn asks you in-app before triggering your browser's own permission prompt. That's deliberate: browsers allow exactly one permission request per site. Dismiss the browser's prompt and the answer is remembered as a permanent no — Aglyn can't ask again, and only you can undo it from your browser's site settings. The in-app card gives you a "Not now" that costs nothing, so the real prompt is only raised once you've said yes. To clear a previous block, open your browser's site settings for Aglyn (the icon at the left of the address bar in Chrome and Edge; Settings → Websites → Notifications in Safari) and set notifications back to Allow.