Start a new site with AI
Aglyn AI is in beta. It is available today on every plan that includes it, and it is still changing as we improve it. Beta means you can use it now, while what it builds and the steps on this page may still change.
Create site opens Start your site straight away, before the site exists. Start with AI asks a few questions, one per step, then creates the site, plans it, writes every page, gives it a look of its own and publishes it at its address. This page walks through each step and what happens after you choose Plan my site.
To scaffold pages for a site that already exists, or for several sites at once, see Generate a website from a prompt.
How do you want to start?
The first step asks for the site's Site name and Subdomain, its free address on Aglyn. The subdomain follows the name until you change it, and is checked as you type: if it is taken, the field says so and offers available ones to pick. Then it offers two cards:
- Start from the starter site gives the site a ready-made home page with a header, footer and contact form, live at its address, for you to edit, in a style you choose: it asks you to Choose a style from the same cards as the Style step, without Pick for me, and Create site creates the site once you click one.
- Start with AI (marked Recommended) asks the questions below and builds the site for you. On the Free plan the card says how many pages a Free start makes.
Bring my site is a third card for moving the website you have now into Aglyn. See Bring my site.
The first step also takes your logo and favicon. They are optional. A logo you add there is in your site's header and footer when the AI builds them, in place of its name.
No site exists until you choose, and nothing is chosen for you. Create site, after you choose a style for the starter site, creates the site with the starter home page in that style and opens it. Plan my site creates the site and starts planning it. The close control and the Escape key create nothing: the window closes and no site is made. If you have typed or picked something, the window first asks Leave without your answers?, because what you typed is not saved. Once the site is being planned, closing only closes the window; the job carries on.
If your role cannot create sites, or your plan has no site left, Create site says so before asking anything. Plan my site checks that planning can start before it creates the site. If it cannot, the window says why and no site is made. On the Free plan, a start that may need more credits than you have left asks first, and the site is created only once you choose. If planning still cannot start after the site is created, the window says why; leaving then gives that site the starter home page, so it is never left empty.
Start from an AI starter
AI starters are rolling out, and your workspace may not have them yet. Where they are on, Start from a starter site opens Choose your starter, and its AI starters tab lists starters Aglyn AI writes your pages from. An AI starter is a set of answers and a look for one kind of site, never ready-made pages.
- On the first step, name your site and choose its address, then choose Start from a starter site.
- Choose the AI starters tab and pick a starter.
- Choose Continue.
Start your site opens on Your site with its questions filled in from the starter, and says so above the first question. The starter's style is chosen on the Style step, and its card says which starter it came from and the look it is set in. Its brand color is picked under that step's More details, as Chosen color. When the starter says what the site is for, that answer is filled in too. Otherwise you say it, as you would for any start. Change any answer you like, then choose Plan my site on Review. It works as always: it creates the site, then plans, writes and publishes its pages for your business.
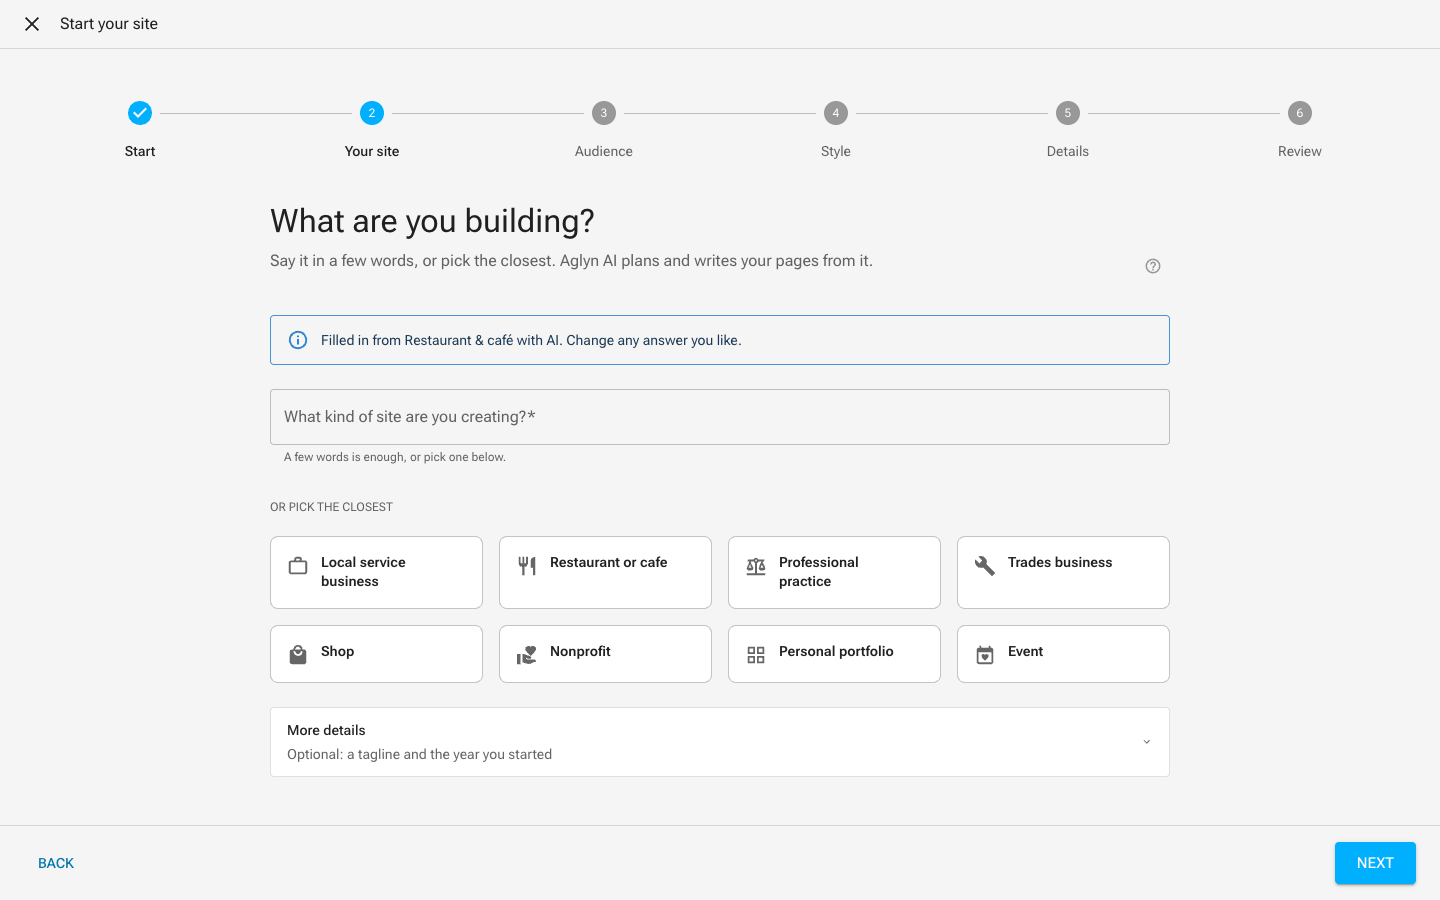
A starter with a price is bought before its answers are shown. Picking one says its price, with Buy and continue, and Continue waits until it is yours. Nothing is created until Plan my site, so closing the window before then leaves nothing behind. If the site is created and its pages cannot be planned, leaving gives it the starter's own pages, so it is never left empty.
The questions, one at a time
Start with AI asks one thing per step. The bar under the title shows where you are: Start, Your site, Audience, Style, Details and Review (on a phone, Step 3 of 6 and a progress bar). Next moves on and Back goes back; your answers are kept either way. Pressing Enter in a text answer is the same as Next. If a step cannot move on, the reason shows under the field and the cursor goes to it. The close control stays in the bar at the top on every step.
Every question step also has More details, a closed section under its answers with optional extras that fit the step. Open it to tell the site more about your business, or leave it closed. Everything in it can be changed later. If something in it cannot be used, Next opens it and says why under the field.
Your site
What kind of site are you creating? is the one required answer. A few words is enough, such as a neighborhood dog groomer that takes bookings, or pick the closest card under the field: Local service business, Restaurant or cafe, Professional practice, Trades business, Shop, Nonprofit, Personal portfolio or Event. A card fills in the field for you. Keep it under 120 characters.
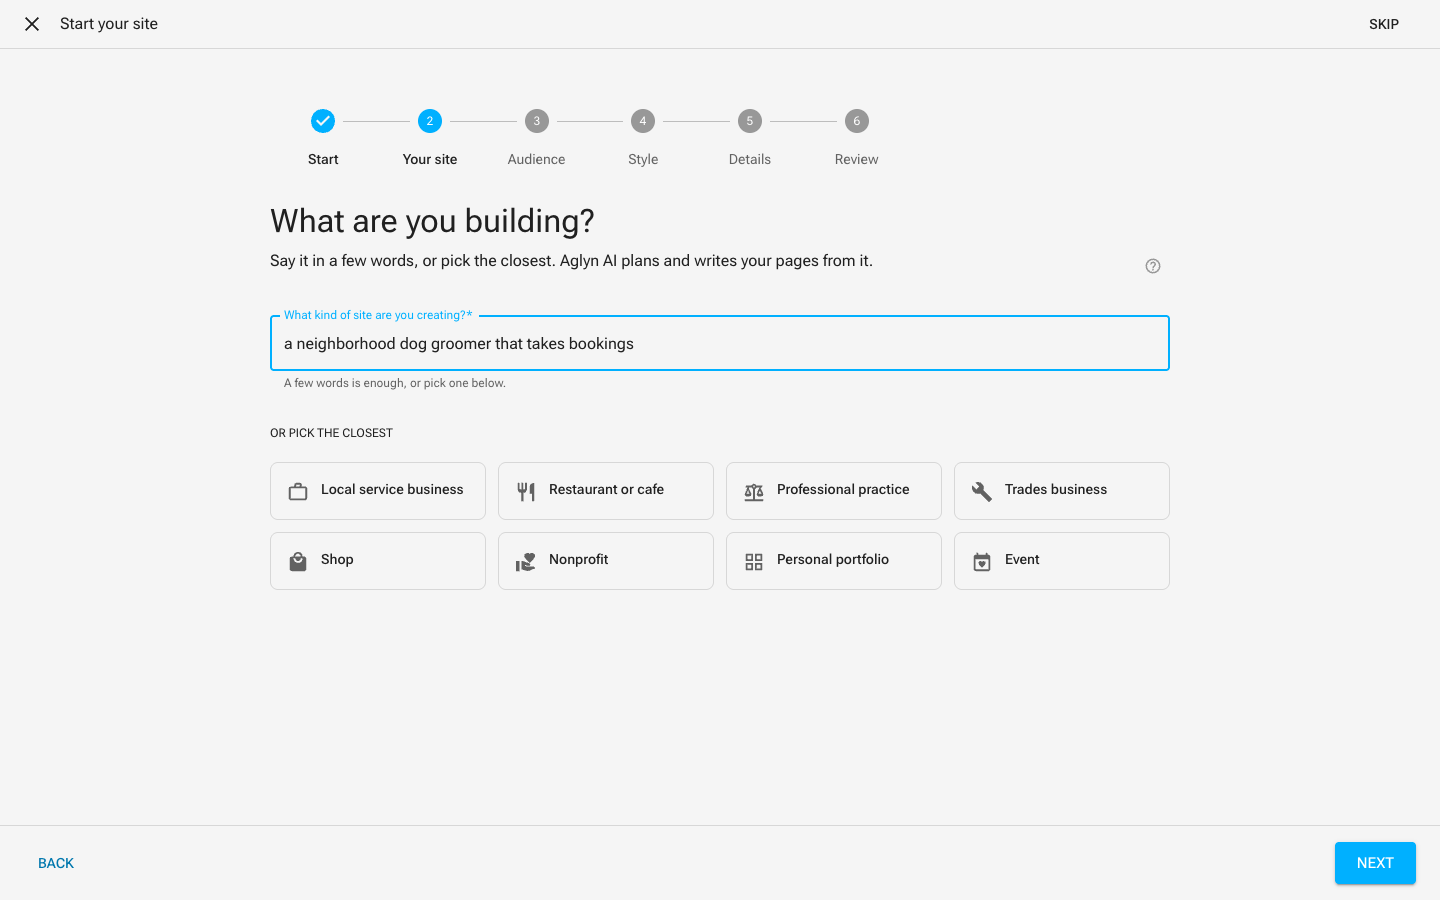
What you write here picks the site's style, unless you choose one yourself, and decides which pages it usually has and what each page says.
More details here: a Tagline, a short line about the business in your words, and the Year founded.
Audience
Who is it for? is optional. It is who every page and every search listing is written for, and it decides which questions the contact form asks. For example, local dog owners who want a regular groom booked online.
Both answers also fill your site's business profile, which every later AI job for the site reads, and so do the areas you serve, from More details.
More details here: the Areas you serve (cities, towns or neighborhoods, one a line), your Price range ($ to $$$$) and the Languages you serve customers in.
Style
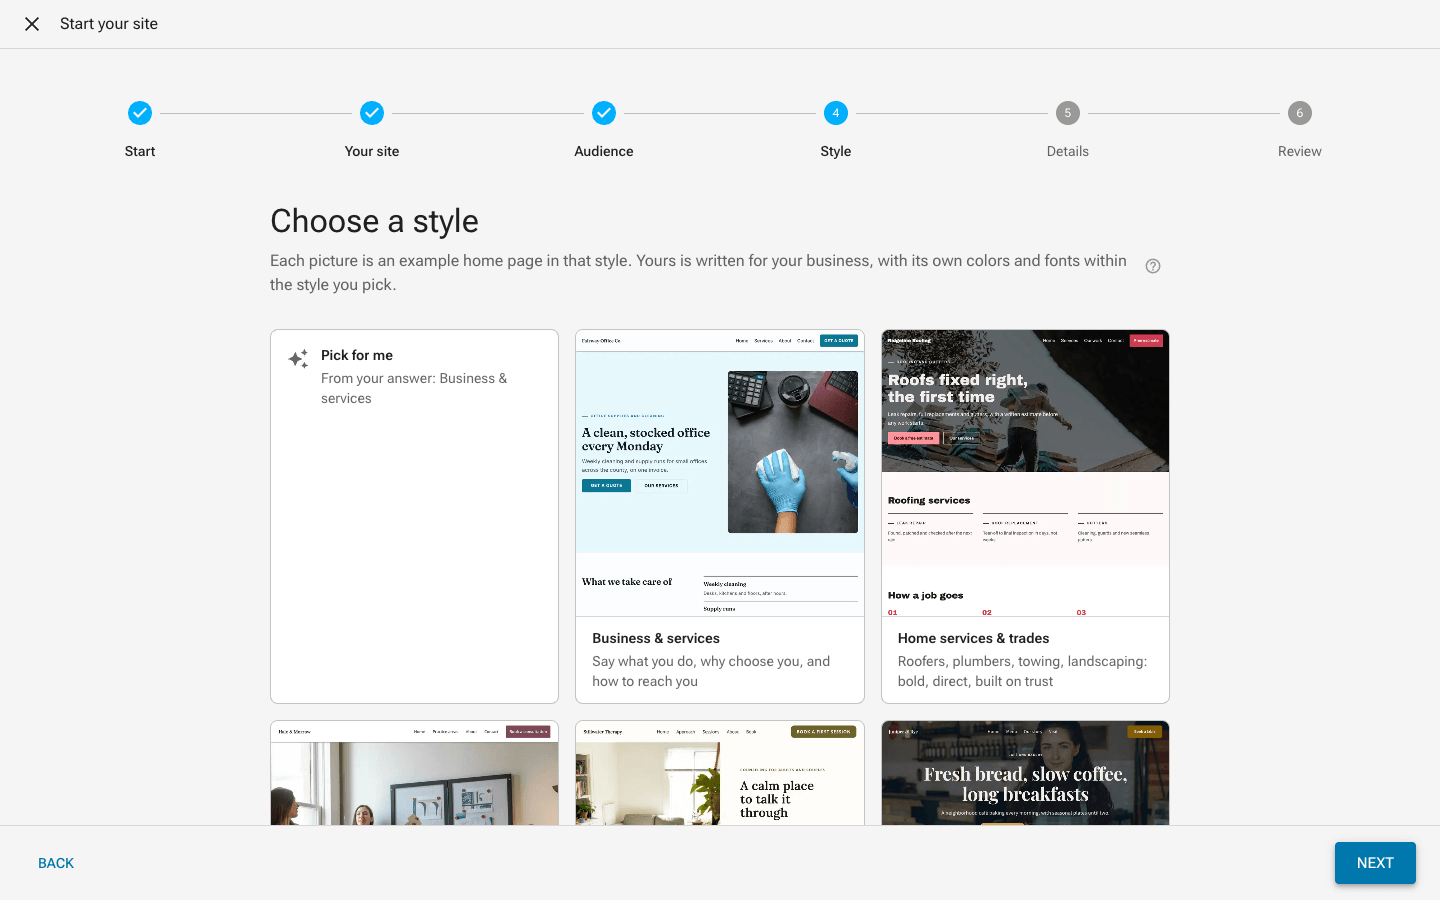
The Style step shows each style as a card with a picture: an example home page of that kind of site, drawn in its style, each with a photo. A photographer's opens on a gallery, a café's on its heading centered over a photo of the café with its menu under it, an online store's on two photos of what it sells, a blog's on a centered heading above a wide photo, an events site's on its dates beside two photos of the day and a real estate site's on a card over a photo of a home, so you can see each style's colors, fonts, buttons and corners, and the shape of its pages, before you pick. The picked card is outlined in color and carries a check. See each style's layout. Nothing is chosen until you pick a card, and Next waits until you do: it says Choose a style, or Pick for me under the cards. Pick for me comes first and is a card you choose like the others. It names the style your first answer suggests, such as From your answer: Home services & trades, and uses it. The style decides how the site looks and which pages it usually has: an online store, a portfolio, a restaurant, a blog and so on. Each site gets its own variation, so two sites with the same style still look different, and yours will not match the picture exactly. See Looks and themes for AI sites.
More details here: a Brand color, picked from the colors shown. It becomes your site's main color, kept readable everywhere it is used. Let the style choose leaves it to the style.
Sites you like
Sites you like is an optional block under the style
cards. Type the address of a website whose look you like, such as https://example.com,
in Site 1. A paid plan can name up to three sites. On the Free plan, Site 2 and
Site 3 are shown but cannot be used, with the reason and an Upgrade link.
Aglyn AI takes only how those sites are laid out and styled: the order of their sections, their spacing and header, their colors, the mood of their type, their buttons, cards and corners, and their motion. It never takes their words, photos or logos, and it uses Aglyn's own themes and font pairings, so your site stays your own.
- The first site's section order leads your home page.
- With more than one site, each choice follows what most of them share, and the first site decides a tie.
- A Brand color you pick under More details wins over the sites' colors.
- On a paid plan, Aglyn AI also matches the features those sites offer, like booking, a store or a blog, with Aglyn's own parts, when your kind of site can have them.
- Only each site's home page is read, once, while your pages are planned.
The Review step lists them under Sites you like, by site name.
Details
-
Business phone and Business email come first. Both are optional. When you give them, your site shows them from the start: on the contact page, in the footer of every page and on the buttons that ask a visitor to call or write, as links that open the phone or the email app. Your site's search listing details and the information AI assistants read carry them too. Without them, no page shows a phone or email row, and nothing is made up.
-
Where do form submissions go? decides where messages from the site's contact form land:
- The Inbox (the default): every message is one to read and reply to.
- The Inbox, and CRM as a lead: every message with an email address is also a lead to follow up.
You can change this on the form itself afterwards.
-
Pages is how many pages to write: 4 to 8 on a paid plan (5 unless you change it), 1 or 2 on the Free plan.
-
Welcome email (paid plans): Draft one writes a welcome email for the people who get in touch through the site, saying what became of their message. It is a draft design. Nothing sends it until you put it in an automation or a campaign. Free starts do not draft one.
More details here: the Street address, City or town, State or region, ZIP or postal code and Country; the Opening hours, picked a day at a time (a switch for each day, and its times from a list); and your Social profiles, one link a line, such as instagram.com/yourbusiness.
Review
The last step lists every answer: the kind of site, who it is for, the style, where form submissions go, the pages and, on a paid plan, the welcome email, then every detail you gave, such as the phone, the email, the address and the opening hours. Edit beside an answer opens its step, and Back to review returns here. Plan my site starts the site.
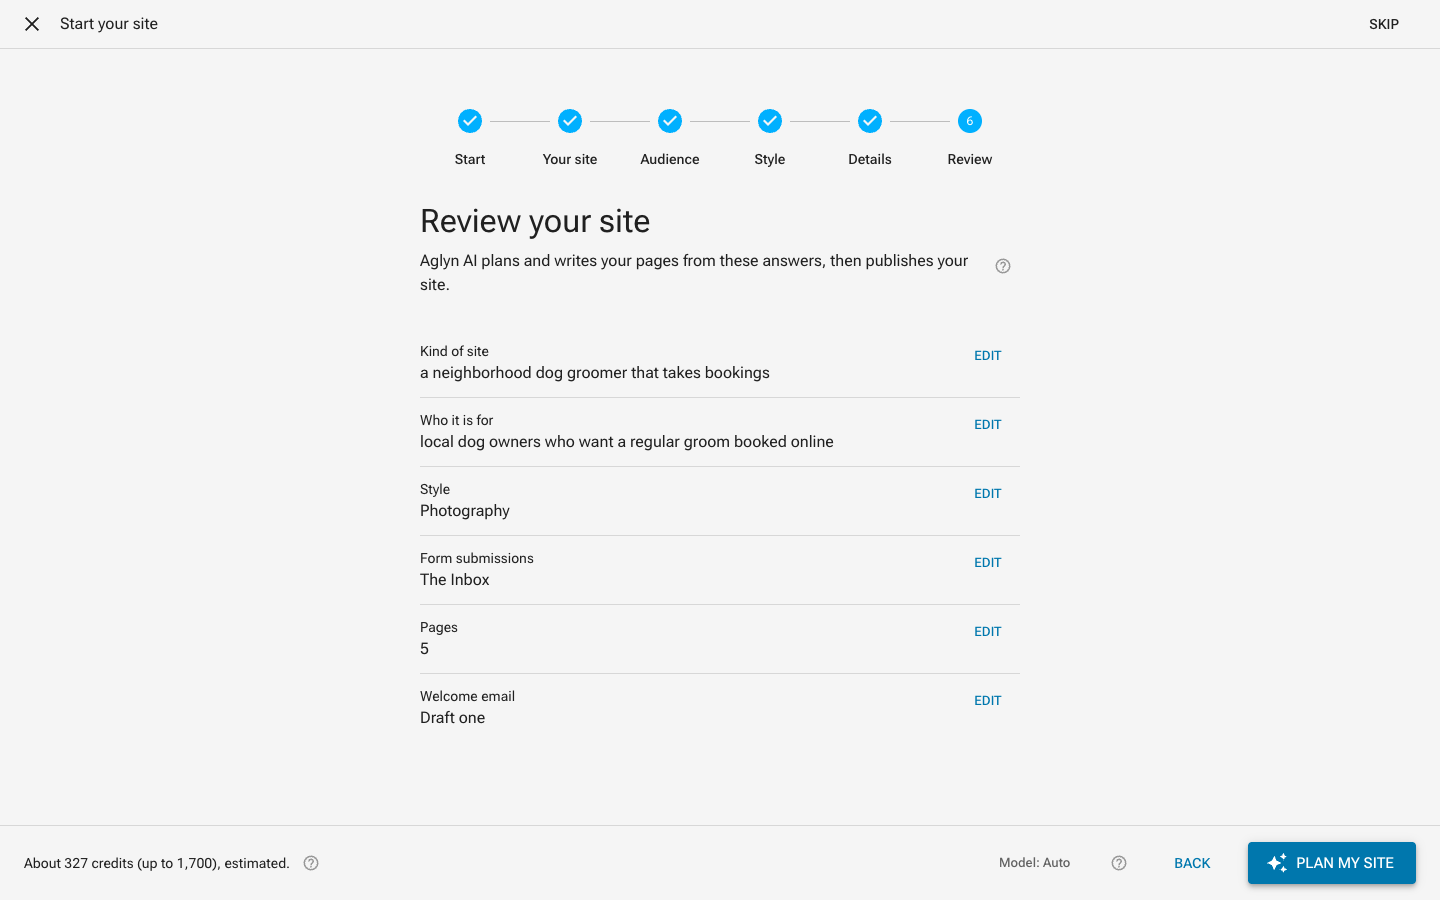
On a paid plan a Model switch sits beside Plan my site. Leave it on Auto unless you have a reason to choose; see Choosing a model.
What it will cost
The bar at the bottom of the review shows what the start will cost before you begin, as About N credits (up to M): about what starts like it cost on real builds, and the most it can cost. On the Free plan it also shows how many of your free credits are left this month and when they renew. If the start will likely use more than you have left, the review says so and offers Build what fits (it builds what your credits cover, then pauses until you Resume), Build the home page first (a one-page start), and Upgrade. Plan my site waits until you choose. See Before a job starts.
What gets built
Plan my site starts the job straight away. A guided start has no plan to approve. It builds, in this order:
- A look: a base theme, colors, fonts and the style of buttons, cards and forms, made for your kind of site. See Looks and themes.
- A header and footer, as the layout every page sits in, with a link to each page. The footer shows the phone and email you gave, as links that call and write.
- A contact form, saved on the Forms page, routed the way you chose, and placed on the page that needs it.
- Your first posts or products, when the site is a blog or, on paid plans, a store. See A store from the start and A blog from the start. Your first events, when your business holds them and your workspace has the Event Calendar add-on. See Events from the start.
- Your pages, each with its sections, its address and its own search title and description. A home page opens with a hero and has several bands below it, such as services, about, social proof and a closing call to action. Photos come from your media library or a stock photo, and every photo gets a description for screen readers and search engines. The page with your contact form also shows the phone and email you gave. A list a page shows, such as your packages or your questions and answers, is kept as a dataset on plans that include datasets. It is shared with this site only, so you edit it on the Data page, and it is deleted with the site if you delete the site. When your answers give no entries for a list, such as a race schedule with no dates, the list starts with sample rows that look complete, so the page does too. A dated list's samples fall on weekends over the coming season, and a list of past results gets past dates, so the two never show the same rows. On the Data page each sample row is marked Sample; replace it with your own, and every page that lists it follows. Saving a sample row makes it yours. Visitors never see the word "sample".
- A welcome email draft, if you asked for one.
- Publishing: see Published, and found by search engines.
Contact details are never made up. A phone number, email, address or opening hours appear only when you gave them on the Details step or entered them in your site settings.
Building your site
Plan my site takes you to the site's Building your site page. It shows one row per step as it happens:
- Planning your pages
- Designing your look
- Building the header and footer
- Building your contact form
- Writing your first posts (Writing your first post on the Free plan) or Adding your first products (a blog, or a paid store)
- Writing your pages, then Writing page 2 of 5: About as each page is written
- Adding your account, cart and policy pages (a paid store)
- Writing your welcome email
- Publishing your site
Each row reads In progress, Waiting, Done, Paused, Not built or Couldn't be built, and a finished row shows the credits it used. Credits used so far adds them up. What we're building opens the plan: every page and its sections. If one part fails, its row says so and the rest of the site keeps building.
You can leave the page: the job keeps going, the notification you get when it finishes — which names the site and, by email, gives its address — opens the page again, and the AI chip in the top bar says what it is doing.
When it is done the page says Your site is live, with the credits the site used, View your site, which opens it in a new tab, and Edit your pages. If some pages were not built, it says how many were and offers Try again what failed, which builds only those.
Paused, or out of credits
When the workspace runs out of AI credits partway through, the job pauses instead of failing, and the page says Your site is paused. Nothing is lost: what it built so far is saved. Once there are credits again, from Get more AI credits or when your monthly credits reset, choose Resume. If you do not, it carries on by itself within about an hour of credits being available.
If it does not work out
If the site cannot be built, the page says Your site was not built and why.
- Try again reopens the questions on the review, with your answers filled in, so you can adjust them and start a fresh job.
- Use the starter site instead gives the site the starter home page. It is offered only while nothing has been built.
When a job fails because of something on our side, the credits it used are given back: all of them if it built nothing, or the failed step's if it had already built some pages. The page says so. A job you cancel yourself is not given back. See Credits given back.
You can also stop the build yourself with Cancel on the Building your site page. The pages it already made stay as drafts, nothing is published, and the page offers Start again and Use the starter site instead. See Cancel a job.
Published, and found by search engines
A guided start publishes the site when it finishes, so it is live at its address:
- the new home page takes the site's address, and an untouched starter home page is moved to the trash;
- each page gets an entry in the header's navigation, and takes its place in Pages in the order the plan lists it, which the built-in error page's links follow too;
- every picture, and every dataset record's photo, still showing a starter photo first gets a photo of your own site: the start asks Pixabay again for any photo it could not copy, then uses the photos it copied for your pages (see Stock photos in AI sites);
- the site's Social image becomes your home page's main photo, unless you chose one (see Your site's Social image);
- a page that cannot be published stays a draft, and Building your site names it with the reason, for you to fix in Edit your pages and publish;
- a page that Couldn't be built, or stayed a draft, is linked from nowhere on the published site: its header and footer entries, and the buttons on other pages that went to it, are taken out, so no visitor follows a link to a missing page. Try again what failed adds the page's header entry back once it is built; a button you want on another page, add in the Besigner.
The site is open to search engines from the start. A guided start never hides a site from search. If you want to keep it out of search results for now, use the site's search indexing setting.
Until the site is built, its address shows a short coming soon page with the site's name, which search engines are asked not to index.
The site's search listing
The site's own search title and description are the fallback for every page without its own, and what search results and AI assistants read about the site as a whole. When the site is published, your answers become them, led by the site's name, as long as the site still has the title and description it was created with (its name and Welcome to …).
A title or description you changed yourself is never replaced. Instead, the site's SEO section shows the start's in a card, The listing your answers describe. Put in the form stages them in the SEO form below as unsaved changes, and the form's Update saves them.
Your business, for search engines and AI assistants
When the site is published, your answers also fill the site's Business details in Setup → Business profile and its structured data in Setup → SEO, so your pages, search engines and AI assistants can tell who runs the site and how to reach you:
- Business details: the business's phone, email and address, and its social profiles where you gave them.
- Entity: the business's description (with Contact is for set to customer support), and what kind of business it is, from the style you picked (a plumber, a restaurant, a salon), with the areas it serves, its opening hours and its price range. A personal site is published as a person.
- Entity logo: your site logo, when the site already has one.
- AI agents: when an assistant should use the site, and how to reach a person there. These open the site's guide for AI assistants, so an assistant asked about your business finds what it does, where it works and how to reach you.
Only empty fields are filled, so nothing you already entered there is replaced. Change the business details in Setup → Business profile, and the rest in Setup → SEO, at any time.
A store from the start
On a paid plan, a site with the Online store style also gets three to six products, each with a description and a photo, and a Cart button in the header. Each product gets a suggested price for what it is, so it can be bought; review or change it, and add your own photo, in Products. A product without a price shows Price coming soon on the store, with no Add to cart, until you give it one. See Product copy and catalogs with AI.
When you describe what you sell as kinds of product, such as "OEM and aftermarket parts, tires, riding gear", and name no product, the first products are samples: a plain item of each kind, such as Knobby dirt bike tire, at a suggested price. Products marks each one Sample, and its editor asks you to replace it with your own product. Saving your changes to a sample makes it yours. Your store shows them as ordinary products, never with the word "sample". When you name the products you sell, those are the ones made, as before.
The home page's Newsletter sign-up band is the store's own email sign-up field, which adds subscribers to your contacts. Your contact form stays on the contact page.
It also gets the pages every store needs, ready to use and published with the rest of the site. They do not count toward the pages you asked for:
-
Your account at
/account, where shoppers sign in or create an account, see their orders with status and tracking, keep their addresses, and find the items they saved with Save on a product page. User accounts are turned on for the site. -
Your cart at
/cart, with checkout.These two are set to Unlisted, so search engines don't index them. The policy pages below are listed like the rest of your site.
-
Shipping & returns, Privacy policy and Terms of sale, written as drafts. The facts only you know, such as your return window or where you ship from, are left in [brackets] for you to fill in. If your plan already has a shipping page, it is used instead of a second one.
The header links Account beside the cart, and the footer links your account and policies. When the site is built, Finish your store lists what is left: connect payments, review your products and prices, set shipping and tax, and fill in your policies, each with a button to the page where you do it. If your workspace's Stripe account already takes payments, the payments step reads Payments connected and is marked done; if Stripe still needs details, it says what.
A blog from the start
A site with the Blog & writing style also gets a Blog collection with three posts on a paid plan, or one post on the Free plan, signed with the business name and published with the site. Each post has a cover photo, and the blog's index page shows the covers on its cards. See Build a blog.
Events from the start
When your business holds dated events, such as a venue, a club, a studio with classes, a meetup, a church or a theater, and your workspace has the Event Calendar add-on, the start adds your first three upcoming events to the Events page, each with a cover photo. They are dated after the day you start, in your site's time zone, and a day or time you gave in your description is kept as you gave it. The page about your events, or else your home page, lists them with the Event List, in one of its planned sections.
The events are published, so they show on your site straight away, when you hold the Publish site content permission on the site, which its admins and editors hold by default. Without it, as with the author role, they are saved as drafts, and the job says so; someone who holds it publishes them on the Events page. Without the add-on the start adds no events. Change or delete them on the Events page like any event.
On the Free plan
A Free start builds one or two pages: the home page and the one page your business most needs. It keeps the site within about eight sections in all, uses the same look, header, footer and contact form as a paid start, and drafts no welcome email or products. A blog gets one first post. It spends from the 300 AI credits a Free workspace has each month.
Who can use it
Start with AI appears when your workspace has AI generation, you have the Generate with AI permission, and AI is on for the site. Otherwise a new site opens on the starter site. See Who can use Aglyn AI.