Build a blog
Aglyn's blog is built on collections — a collection holds your entries, and its pages
are first-class designed pages: the list at /{collection} and each entry at
/{collection}/{entry} render through your site's theme and shared layout, and can be
fully designed in the Besigner via template pages.
Free to start; content features scale with your tier.
1. Create a collection
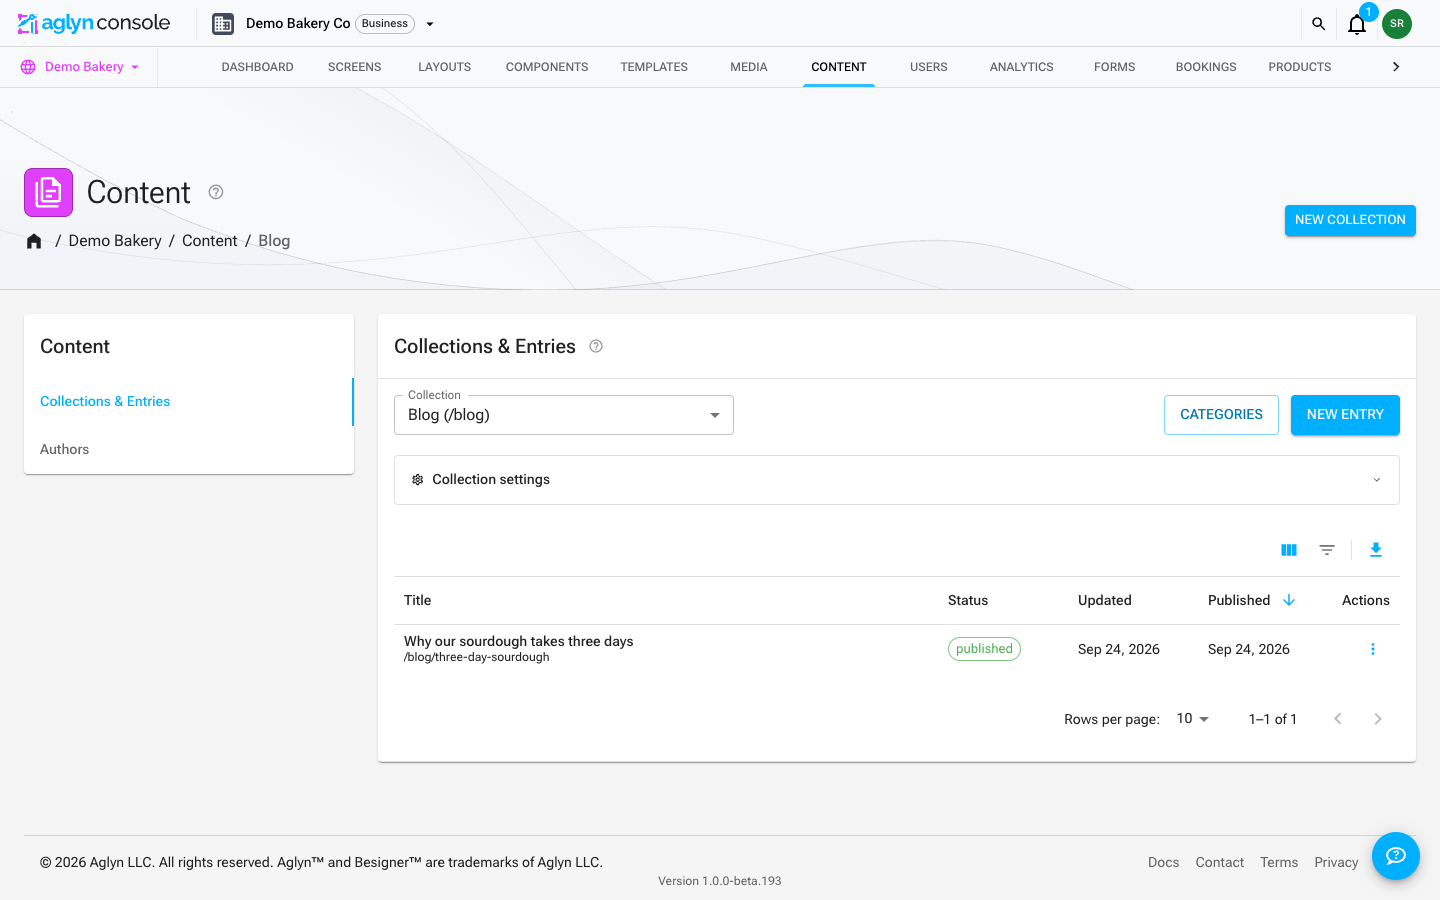
In Content, create a collection for your posts. Manage entries from the console.
A new collection is not a page yet. Its listing at /{collection} goes live with the first
entry you publish (or a scheduled one, once its time comes), and so do its paged and
category listings and its RSS feed. Until then those addresses answer 404 and your sitemap
and /llms.txt leave the collection out, so an empty section never shows up on your site or
in search. Unpublish or delete every entry and the listing comes down the same way.
Delete a collection
Delete collection is at the bottom of Collection settings, the panel under the Collection dropdown in Collections & Entries, and acts on the collection currently picked in that dropdown. It is a site admin action: if your role on this site is editor or viewer the button is not there at all, and an org role on its own does not grant it — the check reads your role on this site. Ask a site admin, or have one raise your role in Members.
Aglyn refuses the delete while anything still depends on the collection, and the dialog tells you which of these it is before you can type anything:
- A template page still points at it. The message names the page and which picker holds it — "Blog" is still the source for "Blog index" (list template). Set that collection's List page or Entry page, under Template pages, back to the built-in option first. Deleting it while a published page renders from it would leave that page with nothing to draw.
- It still has entries. The message gives the count — "Blog" still has 12 entries. Delete them from the entries table first, one at a time; deleting a collection never removes published entries for you.
The dialog also names the published pages, layouts and components that link to the collection's listing page — any Button, Page link, Tabs link or other link pointed at the listing with the Page picker, a component's Link property default included. A link does not block the delete: the page holding it keeps rendering, but the link stops working, so point it somewhere else before or after you delete. The dialog reads Checking where it is used… until that check finishes, and says so if the check could not run rather than reporting that nothing links there. A listing address typed into External URL is not counted, because nothing records which collection it meant.
Once nothing depends on it, type the collection's display name exactly — the name, not
the slug, and capitalization counts — and confirm. Deleting removes the collection, its
category list, and its template pointers. Your pages are not deleted (they keep
their design and simply stop being template pages) and nothing in the media library is
touched. The /{collection} and /{collection}/{entry} routes stop resolving on the live
site within about a minute; there is no publish step.
There is no trash and no restore. A deleted collection comes back only from your own export. Export anything you may want before you confirm.
2. Write entries
Add rich blog entries with images, a live preview, and scheduling so posts publish at the right time.
New entry, or clicking any row in the entries table, opens that entry on its own page. The page has its own address, so you can bookmark an entry you're mid-way through or paste the link to a colleague and they land on the same one. Back to entries — or your browser's Back button — returns to the list; if the entry has edits you haven't saved, you're asked before they're dropped.
The table opens with the most recently Published entries first. A scheduled entry sorts by the date it's due to go out, so the next posts in your queue open the list, and when you reverse the column they come last among the dated entries. Click the Title, Status, Updated or Published header to sort by that column, and again to reverse it. Entries with nothing in the sorted column, such as a draft with no published date, follow the rest in either direction rather than dropping out. Filters in the table's toolbar narrows the list by Title (a word of it), Status, Category, Author, or the Published or Updated date, and Search finds an entry by the start of any word of its title. Every filter and the search word are part of the list's query, so they look through the whole collection, not only the page you're on, and each filter in force shows as a chip above the table. While the list is filtered or searched it sorts by Published or Updated, and a date filter sorts by the date it filters; a note above the table says when the order moved. A combination that cannot be asked at once — a Title filter beside a search, two date ranges, or is any of picks that multiply past thirty combinations — is left out, and the table says which one and why. See Filter and search a list.
Each entry carries, besides the title, excerpt, cover image, and markdown body:
- Category — a single bucket (e.g.
Guides) used for filtering and related posts, picked from the collection's category list (see below), never typed free-form. - Tags — comma-separated labels (e.g.
nextjs, seo). - Author — the entry's byline: an author record from the Authors tab or a one-off custom byline. An entry needs one to be published or scheduled; a draft can be saved without it. See Authors.
- SEO title / SEO description — search & social overrides; they fall back to the title and excerpt when blank.
- Featured video — a film for the entry's page: one from your media library, a video link, or a Wistia link. It plays where the cover image would sit. Video length (seconds) beside it is how long the film runs, which search results can show; it fills in when you choose a library film. See Build a video collection.
Scheduling
The same three publication controls live in two places, so you can decide when a post goes live without leaving what you're doing: the entry row's actions menu in the list, and a Publication panel at the bottom of the entry's own page.
- Publish / Unpublish — takes the entry live, or pulls it back, immediately.
- Schedule… — pick a Publish at time in the future (the past is refused). The status chip reads Scheduled with the local time, and the entry goes live within a minute or so of that time. There's no manual step: its status flips to published on its own, and the listing, its category pages, any page that shows the collection, the sitemap and the RSS feed all refresh together.
- Edit published date… — sets the date the entry claims it was published, and it must be in the past. This is what search engines read as the article's publication date, so it's the control to use when you've imported an archive and every post is dated to the day you migrated.
Published date is when a post says it went out; Publish at is when a post is due to go out. Scheduling refuses a past time and backdating refuses a future one, so each control only ever writes its own field. The Publication panel states which one it's showing you — "Published {date}" against the first, "Scheduled for {date}" against the second.
View opens the live URL once the entry is published.
Authors
Content is often published under a byline that is not the account that wrote it — a pen name, a guest contributor, or the company itself. So an author is its own record rather than a user: open the Authors tab on the Content page to create them, and pick one per entry.
The Authors table's toolbar filters it: Filters narrows it by Author (a word of the name, or the whole name) or Type (Person or Organization), and Search finds an author by the start of any word of their name. Both are part of the table's query, so they look at every author on the site, not only the page on screen, and the table lists authors by name; its column headers do not re-sort it. An Author "contains" filter cannot be asked beside a search, and the table says so rather than applying it. See Filter and search a list.
Each author is either a Person or an Organization, and the choice is a real
one — they are different schema.org types with different fields, so the editor shows
only the fields that apply:
| Field | Person | Organization |
|---|---|---|
| Name | required | required |
| Page address | their page on your site | their page on your site |
| URL | their own site, elsewhere | their own site, elsewhere |
| Portrait / Logo | published as image | published as logo |
| Job title | yes | — |
| Works for | yes | — |
| Links | the row of marks a reader clicks | same |
| Profile links | sameAs, one URL per line | sameAs, one URL per line |
| Bio | shown beside the byline; not structured data | same |
| Search description | the snippet under their page in results | same |
| Share card | the picture their page is shared as | same |
The portrait is a media-picker target — choose from the site or organization library, or paste a URL if the avatar lives elsewhere.
The author's own page, in search and in a share
The last two fields describe the page, not the person, and both fall back to a field above them — so an author who ignores both keeps the page they have today.
Search description overrides the bio in the <meta name="description"> of their
author page. The bio is the fallback because it is already the sentence that
describes them to a stranger; it is often the wrong length, because it is printed
beside a heading and runs as long as you like, while a search result cuts off at
roughly 155 characters.
Share card overrides the portrait as the picture the page is shared with, and changes the card's shape with it: a page with a share card shares as the large card, and one without keeps the small one. That is not a preference — a portrait is square, and a square face dropped into a wide card is cropped to a letterbox. Bring 1200×630, and describe it in the box that appears once you have picked one, which is what a screen reader announces in a social preview.
Links a reader can click
Profile links and Links answer two different questions, which is why both
exist. Profile links are sameAs: a bare list of URLs, published for crawlers so
they can join this author to the same person elsewhere. Nothing draws them.
Links are the ones your visitors see — a row of marks under the bio on the author card and the author page. Each row is one of two kinds:
- pick a platform (X, LinkedIn, GitHub, Mastodon, YouTube, Instagram, Facebook, Website, Email, RSS) and the mark and the label come with it. You cannot change them, and that is deliberate: an X link drawn with a GitHub glyph is a broken link that still resolves;
- pick Custom link for anything else — a newsletter, a conference talk, an ORCID record — and you choose the label and the icon yourself, because no mark for it would mean anything to a reader.
https:// and mailto: only. Every link you add here is also published into
sameAs, so you never have to type a profile URL twice — an email address is the
one exception, since sameAs is for pages that identify the same entity.
An author flows straight into the entry page's structured data: the Article's
author becomes that Person or Organization, with its url, image, job title and
profile links, while publisher stays the site entity you set in
Setup → SEO → Entity — who wrote the piece and who put it out are different
claims. The byline also fills the Entry Meta block and the {{entry.author}}
token wherever they appear.
Entries reference an author by a stable id, so renaming an author updates every
post at render time, exactly like categories. Deleting an author leaves its entries
with the byline as plain text — they keep rendering, they just lose the link,
portrait and profile links in their structured data. Posts written before authors
existed keep their typed byline and are published as a Person with that name, as
they always were.
A site holds up to 200 authors.
The author's page
Every author gets one page, at /author/{slug}, collecting everything they wrote
across every collection — blog posts, changelog notes and press releases in a
single list, newest first. One person, one address, however many sections your site
has. Deeper pages live at /author/{slug}/page/2.
Page address is that slug. Leave it blank and it comes from the name
(Zach Gover → /author/zach-gover); set it when you want an address that survives
a rename, or when two people share a name. The old address keeps working either way
— a page answers to the stored slug, the display name and the record id at once.
The byline links there on its own. Entry Meta turns the author's name into a link to their page, and the Entry Author card does the same — their own site stays available as one of the link rows rather than competing for the name. Both have a switch if you want plain text instead.
Author pages are also submitted in your sitemap, one URL per author.
Designing the author page
Left alone, an author page renders a built-in themed page inside your site's shared layout — portrait, name, role, bio, links, then their posts. To design your own, build a page and pick it under Author page template on the Authors tab. It applies to every author, because a masthead whose design changed as a reader clicked between colleagues would be a strange thing to build on purpose.
On that page:
- the Author Profile block draws the person — portrait, name, role, bio and links — filled from whichever author's page is being rendered;
- a Collection Entries block lists their posts. Leave its collection blank: on an
author page it repeats their entries from every collection. Bind
{{entry.collection}}on the card to label which section each post came from; {{author.name}},{{author.bio}},{{author.jobTitle}},{{author.worksFor}},{{author.image}},{{author.url}},{{author.pageUrl}}and{{author.entryCountLabel}}("12 posts", pluralized for you) resolve per author;{{pagination.page}},{{pagination.totalPages}},{{pagination.prevUrl}}and{{pagination.nextUrl}}are the same four a collection list template uses, so a pager you have already built works here unchanged.
The page you pick stops serving at its own address, exactly like a collection's
entry template — it renders /author/… instead.
The page publishes ProfilePage structured data with the author as its
mainEntity, using the same Person or Organization shape every article of theirs
already carries as its author.
Categories
Categories are managed per collection — open Categories next to the template pickers (or Manage categories… inside the entry editor) to add, rename, or delete them.
Entries reference a category by a stable id, so renaming a category updates every post instantly without touching a single entry — the display name is resolved at render time wherever it appears (entry pages, meta lines, related posts, RSS, JSON-LD). Deleting a category leaves its entries uncategorized until they are reassigned. A collection holds up to 50 categories.
Each category also takes a Description, which becomes the meta description of its
own /{collection}/category/{slug} listing. Leave it blank and that listing inherits
the collection page's description — which is true enough, but means every category on
the site is described by the same sentence, and a search engine reads that as several
pages saying the same thing. One line per category is enough to tell them apart.
Posts written before category lookup existed keep rendering their old free-typed category; the entry editor flags them so you can migrate each post to a real category with one save.
Visual editor
The body opens in a Visual tab — a WYSIWYG surface where you edit the formatted article directly. It is native to the markdown dialect: what you type round-trips losslessly to the same markdown string the site stores and renders, so nothing is ever saved as HTML. A Markdown tab sits beside it with the raw source and a live preview pane (rendered with the exact same parser the published site uses); both tabs edit the same content, so you can switch freely.
The shared toolbar works in both tabs:
- B / I — bold or italicize the selection (
Cmd/Ctrl+B,Cmd/Ctrl+Iin Visual). - H2 — toggle the current line between paragraph and heading.
- Link — wrap the selection as a link. A Link to box searches this site — its
pages, its collection listings, their RSS feeds, and the entries themselves — so one
post can link another by picking it. What is stored is the target, not its address, so
the link follows a renamed post or a renamed collection; a typed
/blog/my-postdoes not. Choose External URL or path… in the same box for an outside address. When you link with nothing selected, a Text box appears; leave it empty and the target's own name becomes the link text — the post's title, never its internal id. In Visual mode, clicking an existing link opens a small popover to edit or remove it (it never navigates), and a picked link shows what it points at by name. - Image — insert an image by URL, or hit Choose from media in the same dialog to pick one from your media library; the standalone Insert image button opens the media picker directly.
Visual-mode shortcuts: type # , ## , ### , - , or 1. at the start of a line
to convert it to a heading or list item; Enter splits a block (and exits a list from
an empty item); Backspace at a line start demotes headings/list items and then
merges paragraphs; Cmd/Ctrl+Z / Cmd/Ctrl+Shift+Z undo and redo. Pasting rich text
(from a web page, Google Docs, etc.) keeps everything the markdown dialect can
express — bold, italic, links, headings, lists, and images — and flattens the rest to
plain text.
Markdown supports **bold**, *italic*,
## headings, - lists, 1. numbered lists, [links](https://…) — including
site-relative links ([pricing](/pricing)) that get client-side navigation — and
.
Prefer a picked link over a typed one for anywhere on this site. A typed
/blog/my-post is a string: it keeps pointing at the old address the day that post's slug
changes, and nothing warns you. A picked link stores the post itself, so it follows the
rename — and if the post is later unpublished or deleted, the sentence renders as plain
words instead of offering a reader a link to nowhere.
There are two heading sizes. Any # run is read as a heading and clamped onto
them: # becomes the larger one and #### or deeper become the smaller one, so a
document pasted from elsewhere keeps its structure instead of leaving a literal #
in the text.
3. Design the list and entry pages
Each collection has two template pickers in Content:
- List page — renders
/{collection}. Drop the Collection Entries block on it: its children repeat once per published entry, with{{entry.*}}tokens substituted per entry. The default card ships title, date, excerpt, and a Read more link, so dropping it in works instantly. - Entry page — renders
/{collection}/{entry}. Use{{entry.*}}bindings and the Entry Body block, which renders the entry's markdown as themed headings, paragraphs, lists, links, and images.
Template pages go through the normal published pipeline — site theme, shared layout, reusable components, variables — exactly like any other page (the same mechanism as commerce product/collection templates).
A second collection whose entries should look like the first one's starts from a copy: choose Duplicate… on the first collection's entry template in Pages, then pick the copy as the new collection's Entry page, under Template pages. See Duplicate a page.
Blog blocks
Besides Collection Entries and Entry Body, three entry-page blocks are available in the block library:
-
Entry Meta — an
author · date · categoryline plus tag chips, with an optional round avatar in front of it. On an entry template it fills itself in from the entry being rendered, so drop it on and it works; each part can be hidden with its Show switch. Typing into Author / Date / Category / Tags overrides what it would have shown — including the{{entry.author}}/{{entry.date}}/{{entry.category}}/{{entry.tags}}bindings, which still work and are still what the block's preset seeds. Date format picks how the published date reads — Site default (8/9/2026), Month and year (Aug 2026), Short date, Long date or ISO. It applies to the date the block fills in for itself; a date you typed in by hand is left exactly as typed. Avatar takes any image from the media library (usually your brand mark) and renders it 36px and round; blank shows no avatar. When the entry's author is a record with a portrait, that portrait is shown instead of the mark you picked — the face follows the byline. It only appears where a byline does: a block with Show author off (a tag row at the foot of an article, say) keeps whatever avatar you chose for it, and gets none if you chose none. -
Entry Author — the author card that closes an article: portrait, name and bio, filled from the entry's author record. Drop it on the entry template and it works; nothing needs typing. Name, Bio, Portrait and Link each override one field (the
{{entry.author}}/{{entry.authorBio}}/{{entry.authorImage}}/{{entry.authorUrl}}bindings say the same thing, for a card you laid out yourself), and Show bio / Show portrait hide a part you do not want. Each part collapses when the record has nothing for it, and an entry with no author renders no card at all. The name links to the author's own url, off-site links opening in a new tab. -
Related Posts — other entries of the same collection that share the current entry's category or a tag, newest first. Attributes: Heading (default "Related articles"), Limit (default 3), Layout, Columns, Show cover, Heading style, Title style, Show date, Date format, Show category and Show excerpt. Layout List — the default — is a plain list of links with a
date · categoryline under each. Layout Card grid lays the posts out in Columns cards per row (default 3), each with a category chip above its title, and makes the whole card the link. Show cover adds each post's cover image; posts without one show their title alone rather than an empty box. Heading style and Title style pick which type step from the site theme the section heading and each post title read at — the same list the Typography element offers, defaulting to Heading 5 and Subtitle 1. Show date, Show category and Show excerpt each add or drop one part of a card; the excerpt is off until you ask for it. Date format picks how each card's published date reads — the same five choices as Entry Meta's, so a card and the byline above it can be made to agree. Renders nothing when the entry has no category/tags or nothing matches.On the besigner canvas there is no entry being rendered, so the block cannot know its real posts. It draws sample cards instead — the same markup, at your own settings, above a dashed note saying so — so you can style the layout and watch it change. The samples never reach a published page; the real posts replace them there.
Drop Entry Meta (or Entry Author) inside a Collection Entries card and each card fills from its own entry — byline, date, category, tags. Date format applies per card, so a listing can read Aug 2026 while another block on the same page reads the full date. Typing a value into the block still overrides what it would have shown, on every card at once.
Entry Meta, Entry Author and Related Posts all read from the entry being
rendered, and the canvas has none — so each previews itself with sample values
(Sample author, a portrait slot, two example tags) rather than a placeholder strip.
Your Show switches and your Date format apply to the preview, so what you are
styling is the arrangement the page will actually ship. None of it can reach a
published page: a real entry replaces it, and an entry with nothing to show renders
nothing at all.
-
Share Bar — X, LinkedIn, Facebook, and copy-link buttons for the current page URL. Attribute: Heading (default "Share").
-
Category Pills — the collection's categories as a row of links: All plus one pill per category. Drop it on the list template page, above the Collection Entries block. Attributes: Collection slug (blank = the collection from the URL) and All label — the text of the unfiltered pill, default "All". Clear the All label box to drop that pill and leave only the category pills; the box then reads
none, which is the value that actually persists — typingnoneyourself does the same thing. Renders nothing until the collection has categories. -
Collection Search — a search box for one collection, with a suggestions dropdown. Drop it wherever the field belongs — typically in the listing's toolbar row, opposite the Category Pills — and it searches the entries that listing is drawn from. Typing opens a panel of matching posts (title, category chip, date and a line of excerpt); the entry cards underneath are left alone, so a reader skimming the list never loses their place. Pressing Enter goes to the site-wide search results page, which is also what the panel's View all results link does — so the box works even before any JavaScript runs. Attributes: Collection slug (blank = the collection from the URL) and Search placeholder (blank = "Search posts…").
Matching is fuzzy and forgives typos, which is what makes it different from the site-wide Search Box element: that one searches your whole site by substring and navigates to a results page; this one answers inside the listing, about one collection. A miss always names how many entries it looked through — and says so when the collection holds more than were read — rather than implying the post does not exist. Renders nothing until the collection has published entries.
The Collection Entries block has a Search switch of its own, which puts a field inside the block. Use that one when you want the cards themselves filtered in place; use this one when the field belongs somewhere the block does not reach.
Category filtering
Each pill is a real link to /{collection}/category/{category}, which renders the
same list template with only that category's entries. Nothing to wire: the pills are
built from the collection's categories and the current one is highlighted
automatically.
Because the category is part of the path rather than a ?query=, each filtered
listing is its own cacheable, linkable, indexable page — it can be shared, opened in a
new tab, and crawled. All is the bare /{collection}, so the unfiltered listing
never gains a second address.
Once the collection has a published entry, a category with nothing published in it still
renders — the page, the pills and the rest of your template, with zero entry rows — so
a reader can pick another pill instead of hitting a 404. The built-in listing writes
"Nothing published in Guides yet." in that gap; on your own list template nothing
fills it, so add your own empty-state message under the Collection Entries block if you
expect thin categories. A category segment that matches nothing at all renders the same
empty listing and is marked noindex.
Pagination composes with the filter: page 2 of a category lives at
/{collection}/category/{category}/page/2, and page counts describe the filtered set.
Category listings join the sitemap automatically.
Pills address a category by its stable id, so renaming a category changes every pill's label without breaking the links between your own pages. A link someone else wrote by hand against the old name is the exception — the route also accepts a category's current name, so an outside link built that way stops matching after a rename and lands on the empty listing above. Prefer linking with the pills.
Entry tokens
| Token | Value |
|---|---|
{{entry.title}} | Entry title |
{{entry.excerpt}} | Short summary |
{{entry.body}} | Raw markdown source (use the Entry Body block to render it) |
{{entry.date}} | Published date |
{{entry.publishedAt}} | Published date and time in ISO 8601, e.g. 2026-08-09T15:30:00.000Z — for a field that needs a machine-readable date, such as a Video element's Publication date |
{{entry.slug}} | Entry slug |
{{entry.url}} | Entry route, e.g. /blog/my-post |
{{entry.coverImage}} | Cover image URL |
{{entry.coverVideo}} | Featured video, as picked: a media library film, a video link or a Wistia link |
{{entry.coverVideoDuration}} | Featured video's length in seconds, e.g. 754; blank when the entry has none — for a Video element's Duration (seconds) |
{{entry.category}} | Entry category |
{{entry.tags}} | Comma-joined tags, e.g. nextjs, seo |
{{entry.seoTitle}} | SEO title (falls back to the title) |
{{entry.seoDescription}} | SEO description (falls back to the excerpt) |
{{collection.name}} / {{collection.slug}} | The routed collection |
{{collection.category}} | Name of the category the URL filtered on (empty when unfiltered) |
{{collection.categorySlug}} | That category's URL segment (empty when unfiltered) |
{{pagination.page}} / {{pagination.totalPages}} | Which page this URL shows, and how many there are |
{{pagination.prevUrl}} | Link to the previous page (empty on the first page) |
{{pagination.nextUrl}} | Link to the next page (empty on the last page) |
The Collection Entries block also works on any page — set its Collection slug
attribute (e.g. blog) and an Entries limit to build a "Latest posts" section on
your home page. Its Filter by category / Filter by tag attributes narrow the
list (e.g. a "Guides only" rail), so filtered landing pages are built as filtered
blocks. The category filter matches either the category's display name or its stable
id, so it keeps working across renames.
No template? Still designed
When no template page is set, the built-in list and article render inside your site theme and default shared layout (the home page's layout), so blog pages never look detached from the rest of the site. The built-in article includes the entry meta line under the title, the cover image (or the featured video in its place), the body, related posts, and a share bar. The built-in list is paginated (see below).
Paginated page sets
Long collections split into pages. The built-in list shows a page of entries with
← Newer / Older → links; deeper pages live at /{collection}/page/2,
/{collection}/page/3, and so on (page 1 is the bare /{collection}). A page past the
end returns 404.
On your own list template page, turn on pagination by setting the Collection
Entries block's Entries per page attribute; it then renders the page from the URL
(the Page attribute overrides it for a fixed page). Without Entries per page, the
block shows the top Entries limit entries as before. The same applies inside a
category: /{collection}/category/{category}/page/2.
Build your own pager
One list template page serves every one of those URLs, so a pager built from
hardcoded links would read the same on all of them. Bind the {{pagination.*}} tokens
instead: a Text block with Page {{pagination.page}} of {{pagination.totalPages}},
and two Link blocks whose URL is {{pagination.prevUrl}} and
{{pagination.nextUrl}}.
Both URLs keep the category you are inside, so "next" never drops the reader back
onto the unfiltered list. And both are empty where there is nowhere to go — no
previous page, no {{pagination.prevUrl}} — which makes a link with no target render as
inert text rather than a link to a page that doesn't exist. That is why you can bind them
on every route without building a variant of the page for each.
4. Publish & syndicate
There is no publish step for the collection itself: publishing its first entry is what
takes it live (see Create a collection). From then on its pages
join the site's sitemap automatically, and each entry's <head> uses its SEO
title/description (falling back to title/excerpt) and its cover image as the social card.
Aglyn also generates an RSS feed per collection, live from its first published entry, at:
https://your-domain.com/<collection-slug>/rss.xml
e.g. https://acme.com/blog/rss.xml. This is the URL to link — it names no site, so
it keeps working if you connect a custom domain later, and it is the one to put behind a
"Subscribe" link.
The same feed answers on the explicit form, if you need to point at another site's:
https://your-domain.com/api/collections-rss?host=<your-site>&collection=<collection-slug>
host accepts your site's platform origin (acme.aglyn.app), your custom domain
(acme.com), or the bare subdomain (acme), and collection is the collection's slug.
Items carry the entry's title, link, publish date, excerpt, and its category and tags as feed categories, newest first. Link it from your own footer or share it with aggregators. Feed readers also find it on their own: every collection page — the list, each paginated page, each category, and each entry — declares the feed in its page head, so pasting your blog's own address into a reader subscribes it to the feed.
Build a video collection
Give every film a page of its own: a collection whose entries are articles with the film where a post's cover image would sit. Search engines list a video from a page that is about that video, and an entry page is exactly that.
Give each entry its film. In the entry editor, Featured video takes a film from your media library, a video link, or a Wistia link. Picking a library film that has a captured frame also fills an empty Cover image with that frame; a cover you already chose is kept.
Say how long it runs. Video length (seconds), under the featured video, is the
film's running time, which a video search result can show beside it. Choosing a film
from your media library fills it in from the file. For a video link or a Wistia link,
type it yourself: 754 for a film that runs 12 minutes 34 seconds. Leave it blank if you
don't know it; the page is still listed without one.
Place the player on the entry template. Add a Video element where the cover would
go and set its fields to the entry's tokens, typed or picked with the field's {x}
button under Entry:
| Video field | Token |
|---|---|
| Video source | {{entry.coverVideo}} |
| Poster image | {{entry.coverImage}} |
| Video title | {{entry.title}} |
| Video description | {{entry.excerpt}} |
| Publication date | {{entry.publishedAt}} |
| Duration (seconds) | {{entry.coverVideoDuration}} |
Use {{entry.publishedAt}} for the date, not {{entry.date}}: the date token is written
for readers, like 8/9/2026, which a search engine cannot read as a date. See
the fields a search result reads.
Keep list cards to a picture. In the list template's Collection Entries card, show
each film as an Image bound to {{entry.coverImage}}. Don't put a Video element in
a card: a list with a player in every card is one page holding many videos, not a page
about any one of them.
No entry template? The built-in entry page plays the featured video with no setup, in the cover's place, with the cover as its poster and the entry's video length as its duration. A Wistia film needs a cover image to show as its poster; without one, the page shows the article without the player.
Tips
- Schedule entries ahead of time and let Aglyn publish them for you.
- Pair the blog with the SEO toolkit — entries emit JSON-LD for rich results.